How To Set DuckDuckGo as Default Search Engine on Chrome
By gobrain
Jun 18th, 2024
If you care about your online privacy and want a search engine that doesn’t track what you do online, you might like DuckDuckGo. DuckDuckGo claims to keep your information private and show unbiased search results. This is why a lot of people like it instead of Google.
So, if you use Google Chrome as your primary web browser and want to make DuckDuckGo your main search engine, let's show you how to achieve this.
How To Change Default Search Engine in Chrome to DuckDuckGo
To set DuckDuckGo as the default search engine in chrome, follow the following steps:
- Launch the Google Chrome browser on your computer.
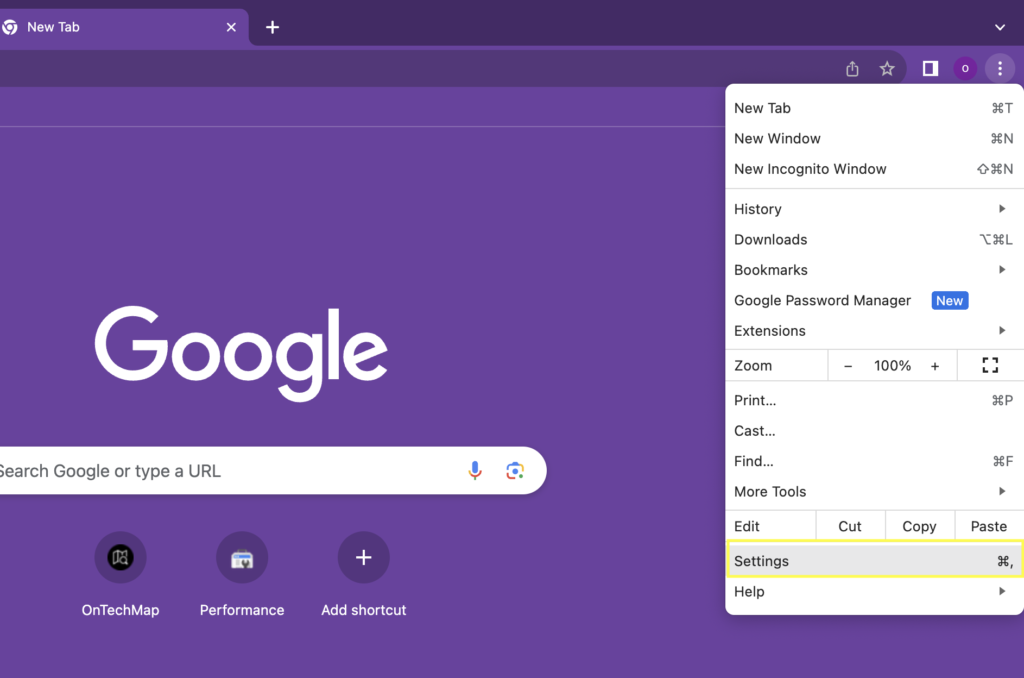
- To access the settings click on the three-dot menu icon located in the top-right corner of the browser window. From the dropdown menu, select Settings.
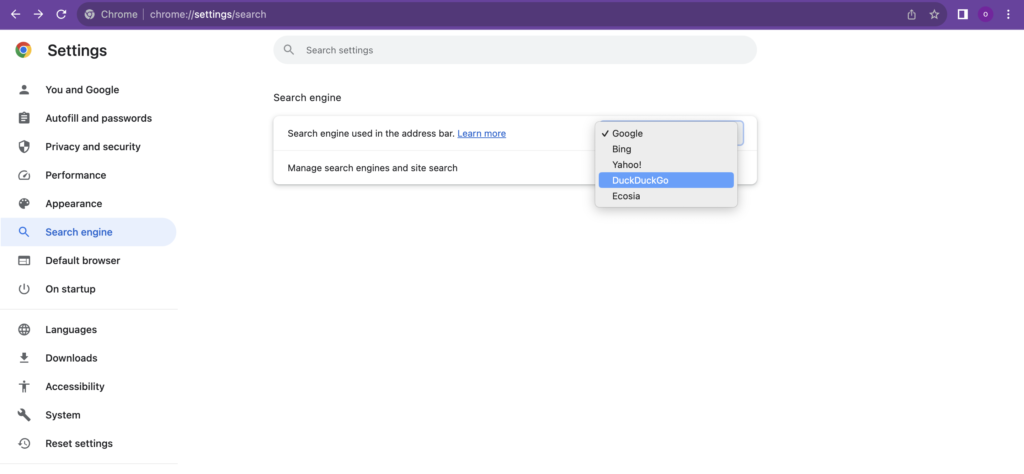
- In the Settings, go to the Search engine section. Here, you’ll find the Search engine used in the address bar option.
- Click on the dropdown menu under the Search engine used in the address bar option. You will see a list of available search engines.
- In the search engines settings, you can see a list of search engines that are available and installed. Click on DuckDuckGo to select it as your default search engine.
- After selecting, DuckDuckGo will now be set as your default search engine.
- To ensure that DuckDuckGo is indeed your new default search engine, simply type a search query into the address bar and hit Enter. Your search results should now be powered by DuckDuckGo.
How To Install DuckDuckGo Browser Extension
You can also install the DuckDuckGo browser extension to make it your default search engine chrome. This extension provides additional privacy features and tools to protect your online activities including:
- Privacy Protection: The extension blocks hidden third-party trackers, ensuring your online activities remain private.
- Encryption: It forces websites to use an encrypted (HTTPS) connection whenever possible, adding an extra layer of security to your browsing.
- Enhanced Privacy Grades: The extension provides privacy grades for websites you visit, helping you understand how well each site protects your data.
- Search Engine Privacy: It also enforces DuckDuckGo as your default search engine, ensuring your searches are private and not tracked.
Now, let’s explore how to install and configure the DuckDuckGo browser extension in Chrome.
- Open Chrome: Launch Google Chrome if it’s not already open.
- Visit the Chrome Web Store: In your Chrome browser, go to the Chrome Web Store
- Search for DuckDuckGo: In the Chrome Web Store’s search bar, type DuckDuckGo Privacy Essentials and press Enter. This will bring up the DuckDuckGo browser extension.
- Install the Extension: Click on the Add to Chrome button next to the DuckDuckGo extension. A pop-up window will appear, asking you to confirm the installation. Click Add extension to proceed.
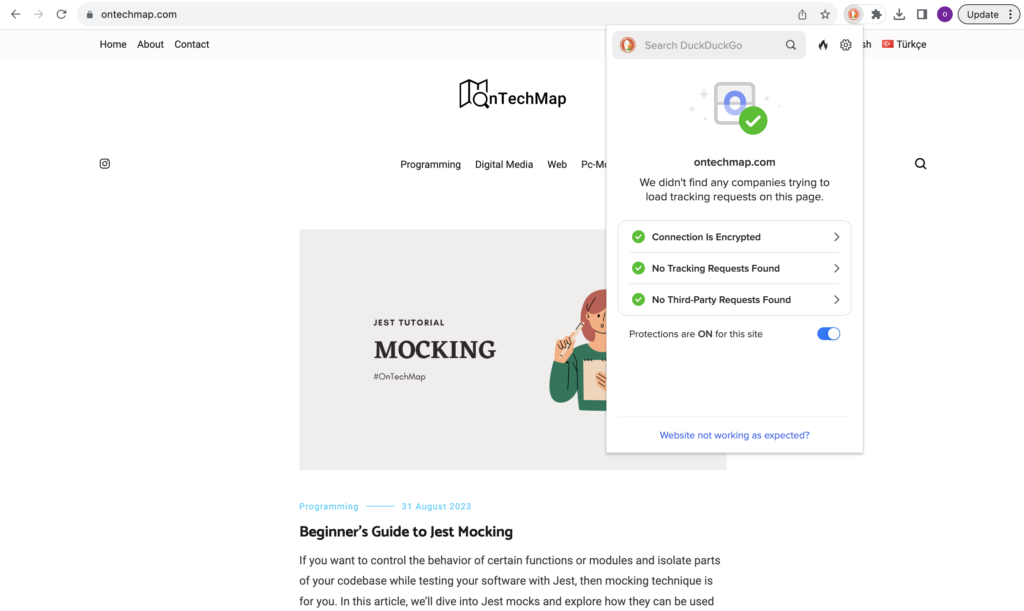
- Configure the Extension: Once the extension is installed, you’ll see the DuckDuckGo logo in the top-right corner of your Chrome window. Click on it to access the extension’s settings.
- Choose Settings: In the extension settings, you can customize various options to suit your preferences. For example, you can enable or disable features like tracker blocking, encryption, and privacy grades. You can also choose to use DuckDuckGo as your default search engine.
- Test Your Privacy: To see the extension in action, visit various websites and observe the privacy grades assigned by DuckDuckGo. The extension will also show you how many trackers it has blocked on each site.


By following these steps, you’ll have successfully installed and configured the DuckDuckGo browser extension for Chrome, enhancing your online privacy and security while browsing the web.
#How To Remove DuckDuckGo Browser Extension
After trying it, there may come a time when you decide to remove it from your Chrome browser. So, follow these simple steps to uninstall the DuckDuckGo browser extension from Google Chrome:
- Open Chrome: Launch Google Chrome if it’s not already open.
- Access Extensions: Click on the three dots (the “More” icon) in the upper-right corner of your Chrome window. This will open a drop-down menu. From the menu, select “Extensions.” and “Manage Extensions“
- Find DuckDuckGo Extension: In the Extensions tab, you’ll see a list of all the installed extensions. Scroll through the list to find the DuckDuckGo Privacy Essentials extension.
- Remove the Extension: To the right of the DuckDuckGo extension, you’ll see a toggle switch labeled “Enabled.” Click on the toggle switch to disable the extension.
- Uninstall: Once the extension is disabled, a “Remove” button will appear next to it. Click on the “Remove” button.
- Confirmation: A pop-up window will appear, asking you to confirm the removal of the extension. Click “Remove” to proceed.
- Extension Removed: The DuckDuckGo browser extension has now been successfully removed from your Chrome browser.
Conclusion
Making DuckDuckGo your main search engine in Chrome can help keep your online stuff more private. DuckDuckGo tries hard to protect your privacy and give you fair search results.
On the other hand, The DuckDuckGo browser extension can help you take control of your online privacy. By blocking trackers, enforcing HTTPS connections, and providing privacy grades for websites. So, give it a try and discover features that DuckDuckGo offers.
In this article we have discovered how to make DuckDuckGo default search engine on chrome using the chrome settings and an extension, moreover we showed how to remove this extension from your browser to back your default. Thank you for reading